
By the Miles Chimney Sweep team · Published Aug 21, 2026
A chimney inspector is answering three questions about your system: Is the structure sound, from the crown at the top to the firebox floor? Is the flue free of dangerous creosote and obstructions? And does everything sit at a safe distance from the wood framing hidden inside your walls? To answer them, the inspector works through the entire system, cap, crown, flashing, and masonry outside; damper, firebox, and smoke chamber inside; and the flue liner that connects it all.
Here is the part that surprises most homeowners: the least important item on that list is the soot you can see. Almost everything that decides whether your fireplace is safe to light is hidden, above the damper, behind the walls, or under a cracked crown you would never spot from the ground.
The Three Questions Behind Every Inspection
The national standard for chimney care, NFPA 211, calls for chimneys, fireplaces, and vents to be inspected at least once a year, and it spells out what that inspection has to establish: the structure is sound, the flue is free of deposits, and clearances to combustible material are correct. Both the National Fire Protection Association and the Chimney Safety Institute of America build their homeowner guidance around that same annual check. Every specific item below is really one of those three questions asked in a particular spot.
Outside: Crown, Cap, Flashing, and Brick
The top of the chimney takes the worst weather and fails first, so the exterior review starts there:
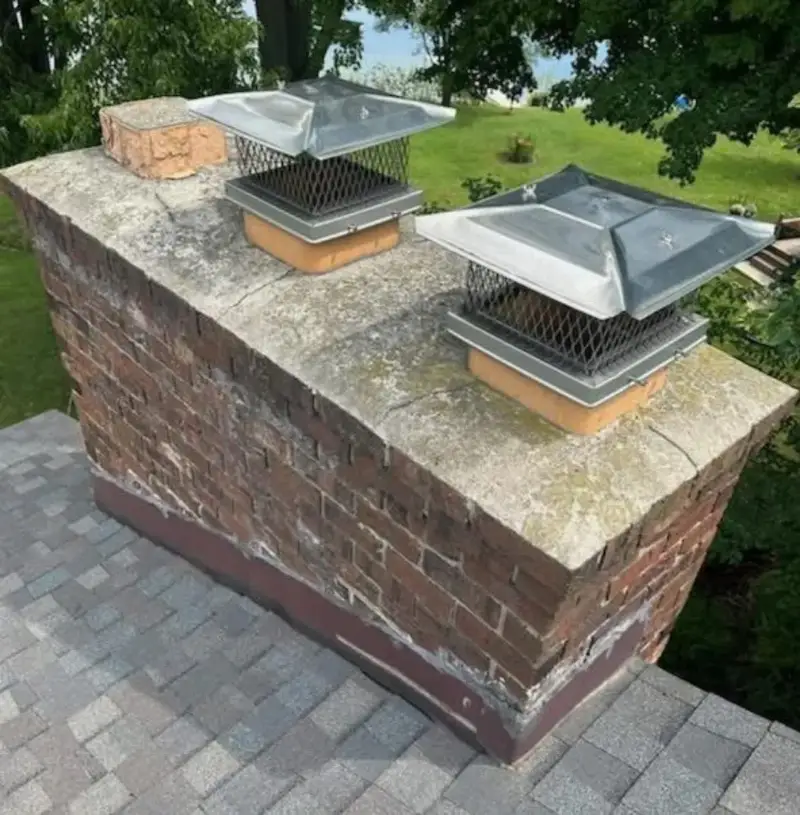
- The crown, the concrete slab sealing the top of the masonry. Cracks here let water soak straight down into the brick.
- The cap and spark screen, a missing or damaged cap is an open invitation to rain, leaves, and animals.
- The flashing, the metal seal where the chimney meets the roofline, one of the most common leak paths into a house.
- The masonry itself, flaking or spalling brick faces, crumbling mortar joints, white staining, and any visible lean.
In wet climates, this part of the checklist earns its keep. Months of steady rain work on brick and mortar slowly, and moss on a shaded crown can hold moisture against the concrete all winter. Water damage rarely announces itself until it is expensive.
Inside the Room: Firebox, Damper, and Hearth
Back indoors, the inspector examines the parts you use every burn:
- Firebrick and mortar joints in the firebox, looking for gaps or cracks that could let heat reach framing behind the wall
- The damper, does it open fully, close and seat properly, and move without heavy rust or binding?
- The smoke chamber above the damper, which should be smooth and free of heavy buildup
- The hearth extension and the clearance between the fireplace opening and nearby trim or mantel
- On wood stoves and inserts, the connector pipe, its joints, and its clearances
The inspector also reads the fireplace for evidence of past trouble, smoke staining above the opening or puffy, honeycomb-textured creosote can point to a chimney fire the homeowner never knew happened.
Up the Flue: The Part Nobody Can See From the Couch
The flue liner is the core of the whole exam. The inspector is looking for cracked or shifted clay tiles, missing mortar between tile sections, and, on metal liners, corrosion or separated joints. Any of these can let heat or combustion gases escape into the structure of the house.
Creosote gets measured, not just noticed. Depth and texture both matter: a common industry trigger for cleaning is roughly an eighth of an inch of buildup, and hard, glazed creosote is a bigger concern than the same depth of loose soot. The flue is also checked for obstructions, bird nests, leaves, and fragments of deteriorated tile. If an active bird nest turns up, timing matters: several nesting species, including the swifts common in the Northwest, are federally protected, so removal has to wait until the nest is empty.
How much of the flue an inspector can verify depends on the level of service. A standard annual visit covers the readily accessible portions; a camera scan of the full flue length belongs to a deeper inspection, typically triggered by a home sale, a suspected chimney fire, or a change to the system. The three levels of chimney inspection are worth understanding before you book.
What Happens With the Findings
A proper inspection ends with documentation, not just a verdict. You should see photos or notes supporting one of three outcomes: the system is fine to use as-is; sweeping is recommended because deposits crossed the threshold, here are the signs a chimney actually needs cleaning; or a repair is recommended. For any significant repair, it is reasonable to ask for the camera footage or images behind the recommendation. And if the inspector finds a serious hazard, a blocked flue, a failed liner, the right call is simple: no fires until it is corrected.
Safe Checks You Can Do Between Inspections
None of this requires leaving the ground:
- Look at the chimney top from the yard or across the street. Is the cap still there? Any visible lean, staining, or plants growing from the mortar?
- Open and close the damper before the season starts and feel whether it seats.
- Pay attention to smoke behavior. Smoke drifting into the room instead of up the flue means stop using the fireplace and get it checked.
- Keep carbon monoxide alarms on every level of the home, the Consumer Product Safety Commission links blocked and corroded flues directly to CO incidents, and an alarm is your backup if a blockage develops mid-season.
What is never on the homeowner list: the roof. Leave anything above the gutter line to someone with the equipment and insurance to be up there.
Getting the Most From Your Annual Visit
Let the fireplace go completely cold before the appointment, no fires for about 24 hours, and clear anything decorative off the hearth. Mention every flue in the chimney when you book, including ones serving a furnace or water heater, and do not skip the visit just because a fireplace sat unused; an idle chimney still needs inspection, since caps fail and animals move in whether or not you burn. Between visits, burning only dry, seasoned wood keeps creosote slow to return. Ready to put eyes on yours before the burning season? Request an inspection quote or call 866-309-2130.
Frequently Asked Questions
Will the chimney inspector need to get on my roof?
It depends on the chimney's accessibility and the level of inspection. Much of the exam happens from the ground, the attic, and the firebox, and many companies use cameras to see the flue interior. When roof access is needed, it is the technician's job, done with proper equipment, it is never something a homeowner should attempt.
Can an inspector spot a cracked flue liner without a camera?
Sometimes, damage near the top or bottom of the flue may be visible directly. But confirming the condition of the full flue length generally requires a video scan, which is part of a Level 2 inspection. Anyone who declares a liner safe or condemned without actually examining it is guessing.
What should I do before the inspector arrives?
Stop burning about 24 hours ahead so the system is cold, move anything fragile or decorative away from the hearth, and jot down symptoms you have noticed, smoke odors, staining, water sounds, or a fire that is hard to keep lit. Those details often point the inspector straight at the problem.
Does the inspector check flues that serve the furnace or water heater?
They should, a single masonry chimney often contains more than one flue, and the ones venting gas or oil appliances need their own check for blockage, corrosion, and disconnections, since those defects can push carbon monoxide into the home. Mention every appliance connected to the chimney when you book so no flue gets skipped.